• You liked BFD7 now you should join this forum and of course become a club member to see what CCA is all about.
  • Thank you to everyone who registered and showed up for the BIG Fish Deal #7.

My Diy Background

SteelFist

Members
Here's my DIY BG that I just completed a month ago. I've included instructions/materials further down this thread in case someone wanted to try it.

I decided to stay away from the concrete because I didn't want to deal with an elevated pH. I also didn't want to sacrifice much tank space. The BG is only 2 inches from the rear.....1 inch in many places.

Enjoy! Critique is welcomed!

Picture144.jpg


Picture148.jpg


It required LOTS of silicone...lol.

Picture151.jpg
 

SteelFist

Members
Instructions:


1) I bought the Styrofoam 1st with the intention of making a background using concrete as I mentioned above. However, I changed that idea when I learned how many water changes I would have to perform due to an increase in pH caused by the concrete.

2) My 1st priority was that I didn’t want to sacrifice much tank space so I used a maximum of 2 inches (thick) Styrofoam.

Below is a list of the materials needed:

1) Styrofoam. (If tank space is important to you, then you can use 2†thick sheets from Home Depot if you’d like. If you’re careful with the knives, you can carve shapes that stand out.)
2) Jagged edge knife with 4-5†blade.
3) Set of hobby knives.
4) Pack of disposable latex gloves.
5) Tape measure.
6) Gravel or river rock of your choice.
7) Aquarium safe silicone. LOTS OF IT!! (If your local aquarium store doesn’t have it, then you can get it from E-Bay)
8) Rags.
9) Bernzomatic blow torch. ($13 at Home Depot)
10) A few decorative rocks. No greater than 1 lb each.
11) 1 can of “Great Stuff†(Spray Foam – Again, at Home Depot)
12) 2†paint brush (optional). (I had better success with my hands – use gloves)
13) Artificial plants (optional)
14) And like those before me, lots of patience.

Instructions:

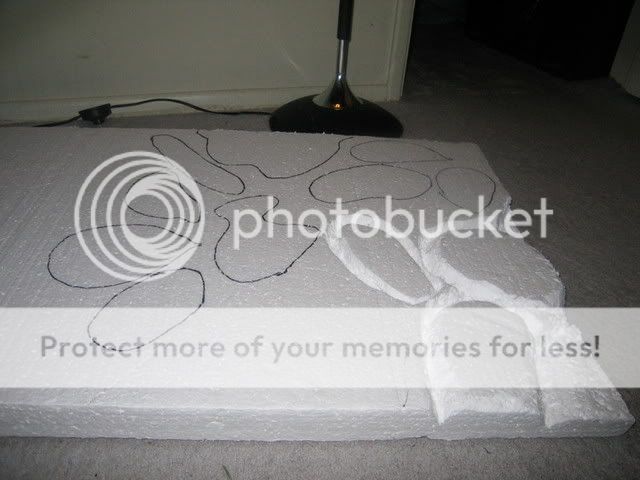
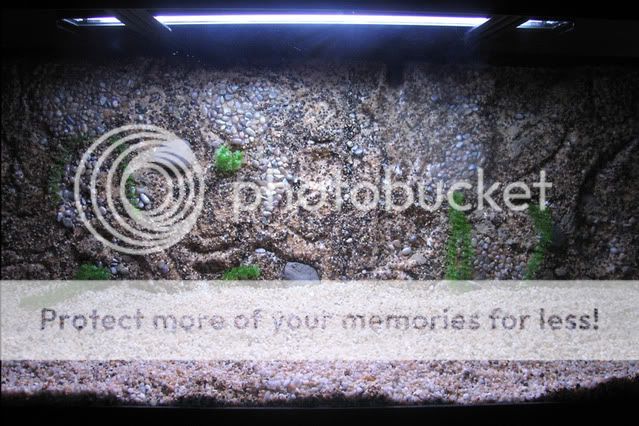
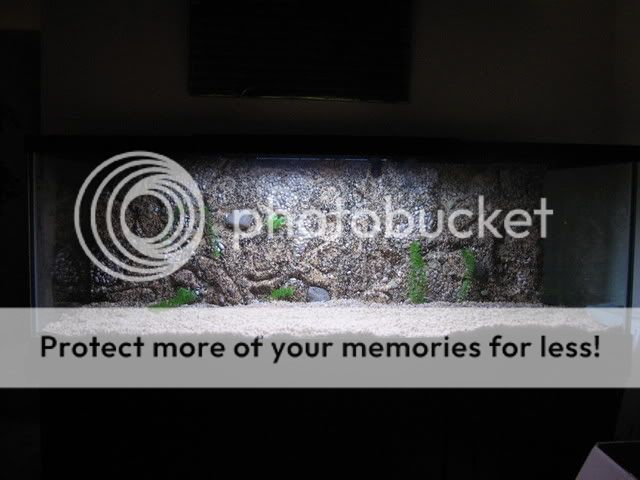
1) First cut the dimensions of the Styrofoam to conform to the size of the rear-glass of your tank. Make sure you divide the foam into at least 2 parts. I say this because you can break the background due to the weight of the gravel and the strength of the Styrofoam. It is best managed when your background is cut into parts that are 3 ft or less.

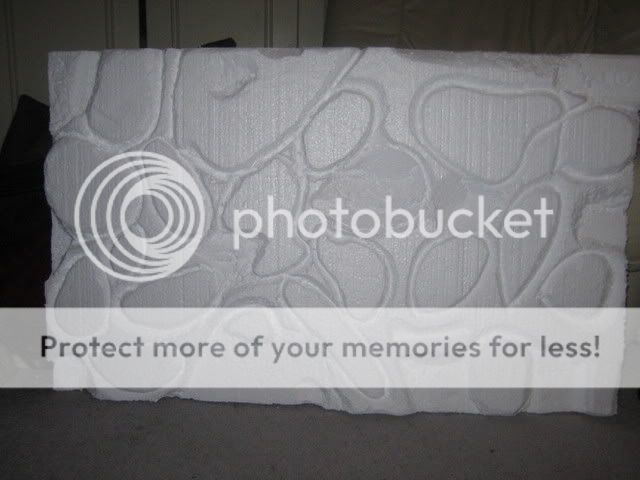
2) You can begin to carve the Styrofoam any way you’d like. Be careful not to carve too deep. Finish all of the carving before moving to step 3.

3) Using the blow torch, begin to heat the carved areas along the Styrofoam. As mentioned in other DIY backgrounds. Use caution, as the foam is flammable and you can burn a hole in it very easily.

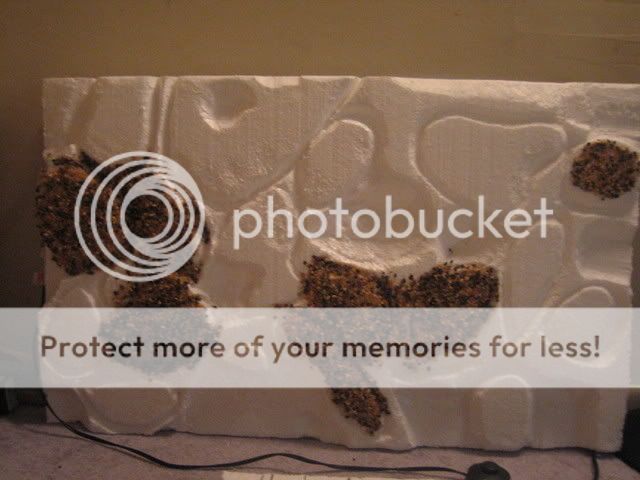
4) Paint on the silicone at least 1/8 inches thick over a surface area of 1 ft2 at a time.

5) Pour the gravel/rocks on the silicone.

6) Repeat steps 4 and 5 until completely covered.

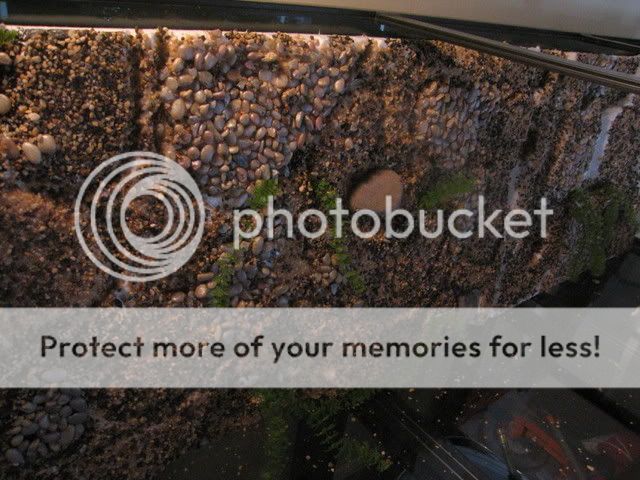
7) After the silicone is cured (48 hrs), stand the background upright to allow all of the loose gravel to fall off.

8) More than likely you will need to fill in gaps from fallen or loose gravel. So please be patient.

9) If you fancy plants, use a knife and slice in 1 inch deep gashes at 45° angles. Slide branches in the slots and then silicone it shut. They will be more secure and difficult for cichlids to remove them by pulling and tugging.

10) If you have any gaps between your two pieces of background you can use a can of Great Stuff to fill it. Then repeat steps 4 and 5.
 

DeeCee

Members
Whoa! Very nice, Steel! I like the look of the finished background alot! :sign0173:

That sure gives me some ideas for the display tank.........glad you included instructions and a Materials List too! SWEET!

DC
 

Pat Kelly

CCA Member
Staff member
Very nice.

I often look at the posts of back grounds and think it would be a ton of work with the concrete.

This looks great.
 

dogofwar

CCA Members
Did you also silicone it to the back glass? How did you keep it from floating?

Matt

Very nice.

I often look at the posts of back grounds and think it would be a ton of work with the concrete.

This looks great.
[/b]
 

SteelFist

Members
Thank you all! Just presenting another option to the concrete for those who don't wnat to deal with excessive water changes :smile:
 

SteelFist

Members
Did you also silicone it to the back glass? How did you keep it from floating?

Matt[/b]

Yep, I siliconed it to the rear glass. I let it dry 72 hours before filling the tank though. I used extra pieces of styrofoam to hold the background to the back glass until the silicone cured. Also the clips of the In & Out tubes for the canister filter in addition to the AC-110 helped secure it to the rear glass as well.

You'd be surprised how heavy the Styro pieces become after all of that gravel is added to it.
 

dogofwar

CCA Members
Thanks and looks great! Would it have been easier with finer materials (e.g. sand)?

<div class='quotemain'>Did you also silicone it to the back glass? How did you keep it from floating?

Matt[/b]

Yep, I siliconed it to the rear glass. I let it dry 72 hours before filling the tank though. I used extra pieces of styrofoam to hold the background to the back glass until the silicone cured. Also the clips of the In & Out tubes for the canister filter in addition to the AC-110 helped secure it to the rear glass as well.

You'd be surprised how heavy the Styro pieces become after all of that gravel is added to it.
[/b][/quote]
 

SteelFist

Members
It definitely would have been easier with sand. I actually used sand in some paces where I had trouble with the gravel. However, I didn't like how the sand looked at those locations. But maybe if sand is used along the whole BG it would come out nice.
 

Charlutz

Members
I made one of the concrete backgrounds. It came out so-so as I got tired of carving the styro. I did learn from the experience. Instead of siliconing the styro, I siliconed some magnets inside the styro. I then put magnets on the back tank glass. No need to silicone the background to the tank and I can take it out if I ever need to change it. I used ordinary Home Depot magnets, but since I did the project I found that you can get neodymium magnets real cheap on Ebay. They are super strong and would work real well. Also, I didn't find curing the concrete to be difficult at all. It took two water changes. I added a bunch of sea salt to the first dose, then freshwater to the next. Took a week. Best thing about DIY, lots of ways to reach good results! :happy0158:
 

SteelFist

Members
I made one of the concrete backgrounds. It came out so-so as I got tired of carving the styro. I did learn from the experience. Instead of siliconing the styro, I siliconed some magnets inside the styro. I then put magnets on the back tank glass. No need to silicone the background to the tank and I can take it out if I ever need to change it. I used ordinary Home Depot magnets, but since I did the project I found that you can get neodymium magnets real cheap on Ebay. They are super strong and would work real well. Also, I didn't find curing the concrete to be difficult at all. It took two water changes. I added a bunch of sea salt to the first dose, then freshwater to the next. Took a week. Best thing about DIY, lots of ways to reach good results! :happy0158:[/b]

Thats great! I wish I had talked to you prior to starting mine. Especially with the magnets....Thats an excellent idea! I dread the day I either decide, or am forced to remove my BG.
 

longstocking

Members
Very cool... I've wanted to do this for a while but all my tanks are full lol.... so without using concrete and using magnets I could do this is a full tank !!!

Just asked Bill to bring me home all the materials LOL.... I love his job ! Comes in handy ! Now I just have to buy the silicone.

BTW.... you can use ge silcone 1 from home depot. It is safe and cheaper.
 

SteelFist

Members
Cool. I'll check out the GE silicone I when I try another PVC cave. The aquarium store silicone is definitely costly.
 

longstocking

Members
Yeah it is !!!

You get this small itty bitty tube for twice the amount. I don't think it says aquarium safe on the tube... but it is ! So don't worry about it. Used it many times.... most diy guys use the stuff as well.
 

tash

Members
what did you do about the heater? my husband wants it and the filter tube covered. hiding the tube won't be hard, but the heater is well... hot.......
 

maddog10

Members
If the heater gets hot enough to melt submerged Styrofoam, you have a serious problem on your hands. I think most folks build a compartment behind the background that gets good circulation or use an in-line heater (or perhaps one that is in a sump under the tank).
 
Top