I just wanted to do a write up to help anyone who needs a strong and high quality tank stand. This stand is vastly more sturdy costs a fraction of the store bought stands. I used the KingofDIY's basic instructions for framing the stand and wrapped it in a way that's simple and tasteful. I am by no means an expert carpenter and I pulled this off with very basic hand tools and the end result is excellent. All the supplies for this cost around $100 but I did already have most of the basic tools.
You will need the following tools and supplies:
2x4's - The amount you need will vary depending on tank size of course
Electric Drill
Circular saw
Miter saw or even a $5 miter box from home depot which I used.
A few wood clamps
A box of 1 1/2" self tapping screws
1d trim nails (or any small little nails)
Hammer
Measuring tape
Wood filler
Sand paper (220 grit and 600 grit should do)
First things first watch this video. I take no credit for this design and if I get a chance to thank him at BFD I definitely will. The frame he shows you how to build is the basis for my build so follow along here closely. I did make a few small changes to suit my needs.
https://www.youtube.com/watch?v=jN4Y9AYuwcQ&list=PLcWeEm9w62mbxY1lefvU5kgYiWRAGVVkU
Measure twice and make your cuts. I would strongly recommend not making the frame the exact size you need. In other words give yourself a little extra all the way around because having an extra quarter inch here and there will insure you dont have to start over if your measurements are a bit off.
I was building for a 55 gallon so I went 49" long and 13.5 inches wide. After finishing the frame it should look like this:

Here is another angle to show you the vertical supports. It is extremely important that the weight of the tank comes down on a 2x4 and is not supported by the screws themselves. With this design the screws only hold things together, no structural support really comes from them.

Once the frame is complete you will want to wrap your stand in a quality covering. Spend a little but more money here and you will easily have a quality stand that looks like something that costs four times as much. I went with some pre-sanded wood which I believe was birch. It was about $25 a sheet but worth it. Getting the pre-sanded stuff is the way to go because its almost ready for stain or paint as is.

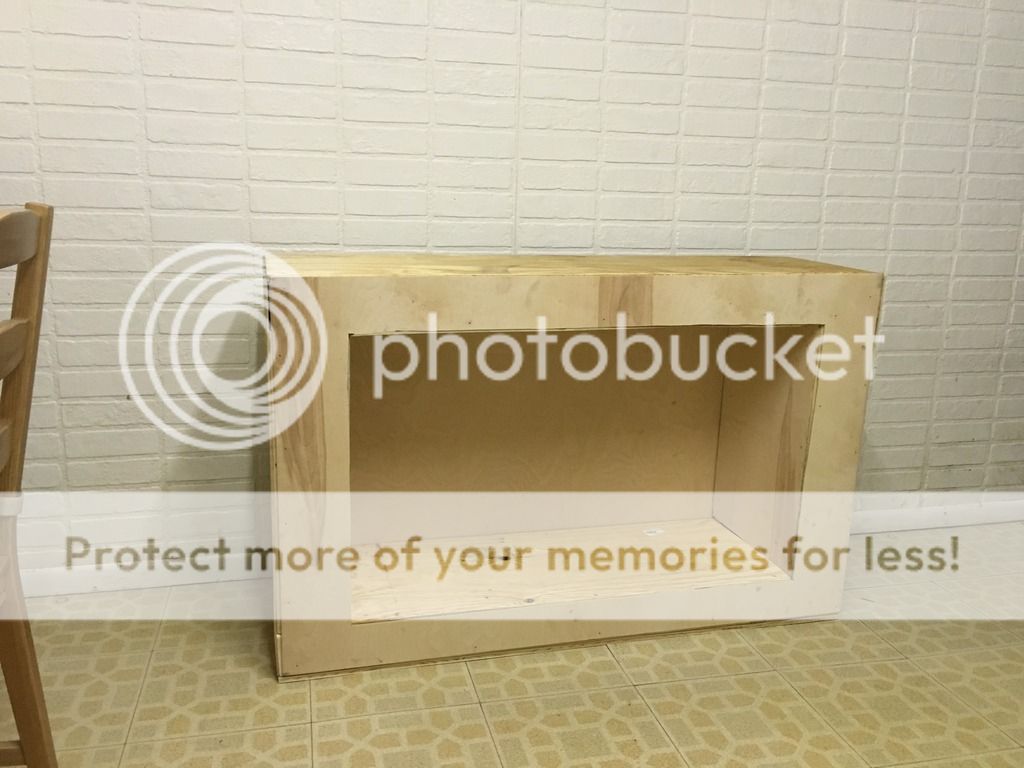
Next order of business is deciding how you want to wrap the stand. The basic formula here is to cut the wood you are wrapping the stand with to size and box in the frame. I opted for an open front with a shelf on the bottom to accommodate a second tank or just some decorations as this is going in the living room. In my case, I took the thin piece of wood I used to wrap the frame with and traced out the opening of the frame onto the wood. I simply laid the wood on the ground and laid the stand on top of it to trace the perfect sized square to cut out. I drilled a small hold into the inner area I was cutting out and used a jigsaw to cut the opening. During this step I also covered the top of the stand where the tank will rest with half inch ply because I am using an acrylic tank. This would also apply if you have a rimless glass tank. Afterwards I also used half inch ply to build the shelf inside the opening I cut out which allows for a smaller tank or other goodies. At this stage in the build the tank looked like this.
Notice that where the wood panels meet I didn't waste any time making precise cuts or measuring perfectly. That is because in the next step I was going to cover all of the areas where two panels meet with decorative trim. I also wanted to cover the very base of the tank with a bit of trim as I plan to have a rubber mat under the acrylic tank which I do not want to be showing. I purchased angled trim for the corners and insides and simple flat pieces of trim for around the top. This was the hardest part of the build as miter cuts can be confusing. I used a cheap $5 miter box because I didn't have a quality miter saw and therefor cut all of this trim with a small hand saw but it wasn't too bad. I used some adhesive especially for trim to attach the pieces and then came behind with some small 1d finishing nails to make sure the trim was on there. You will want to counter sink the nails and use some wood putty to hide all the nail holes. Another important step here is to take your wood putty and fill in any gaps where two pieces of trim meet. You will later sand all this down and it will make the trim look quite seamless. At the end of this step the stand looked like this. Note that I hadn't quite finished all the trim work yet but you get the idea:

The next step is to get out some 220 grit sand paper and start knocking all the wood putty flush with the surrounding wood. Remember you want to use putty anywhere you put a nail and anywhere that two pieces of trim meet. Take your time and look at the stand from multiple angles because you will find spots you missed. I also used some wood putty on the surface where the tank sits to take out any gouges or inconsistency in the plywood I used. I sanded the plywood top with some 220 grit on a large block to insure it was flat and there were no major high or low spots.
After all the sanding is done you should wipe the stand down with a warm damp cloth and allow it to dry. Once dry and free of all loose wood dust you can take a spray can or two of filler primer and really coat things well if you plan to paint which I recommend over stain for this style build. The filler primer is high piling so it takes out some of the inconsistencies here and there. Allow 24 hours or so to dry then take some 800 grit sandpaper and smooth out the primer. Once again use a damp cloth to clean the surface and allow to dry. After this step you can paint the stand any color you want just follow the instructions and don't lay the paint on too thick in a single coat. I did about 3 coats requiring maybe 4 cans of black semi-gloss.
Here is the final result! It looks nearly furniture store quality and will make a good addition to my living room.

You will need the following tools and supplies:
2x4's - The amount you need will vary depending on tank size of course
Electric Drill
Circular saw
Miter saw or even a $5 miter box from home depot which I used.
A few wood clamps
A box of 1 1/2" self tapping screws
1d trim nails (or any small little nails)
Hammer
Measuring tape
Wood filler
Sand paper (220 grit and 600 grit should do)
First things first watch this video. I take no credit for this design and if I get a chance to thank him at BFD I definitely will. The frame he shows you how to build is the basis for my build so follow along here closely. I did make a few small changes to suit my needs.
https://www.youtube.com/watch?v=jN4Y9AYuwcQ&list=PLcWeEm9w62mbxY1lefvU5kgYiWRAGVVkU
Measure twice and make your cuts. I would strongly recommend not making the frame the exact size you need. In other words give yourself a little extra all the way around because having an extra quarter inch here and there will insure you dont have to start over if your measurements are a bit off.
I was building for a 55 gallon so I went 49" long and 13.5 inches wide. After finishing the frame it should look like this:

Here is another angle to show you the vertical supports. It is extremely important that the weight of the tank comes down on a 2x4 and is not supported by the screws themselves. With this design the screws only hold things together, no structural support really comes from them.

Once the frame is complete you will want to wrap your stand in a quality covering. Spend a little but more money here and you will easily have a quality stand that looks like something that costs four times as much. I went with some pre-sanded wood which I believe was birch. It was about $25 a sheet but worth it. Getting the pre-sanded stuff is the way to go because its almost ready for stain or paint as is.

Next order of business is deciding how you want to wrap the stand. The basic formula here is to cut the wood you are wrapping the stand with to size and box in the frame. I opted for an open front with a shelf on the bottom to accommodate a second tank or just some decorations as this is going in the living room. In my case, I took the thin piece of wood I used to wrap the frame with and traced out the opening of the frame onto the wood. I simply laid the wood on the ground and laid the stand on top of it to trace the perfect sized square to cut out. I drilled a small hold into the inner area I was cutting out and used a jigsaw to cut the opening. During this step I also covered the top of the stand where the tank will rest with half inch ply because I am using an acrylic tank. This would also apply if you have a rimless glass tank. Afterwards I also used half inch ply to build the shelf inside the opening I cut out which allows for a smaller tank or other goodies. At this stage in the build the tank looked like this.

Notice that where the wood panels meet I didn't waste any time making precise cuts or measuring perfectly. That is because in the next step I was going to cover all of the areas where two panels meet with decorative trim. I also wanted to cover the very base of the tank with a bit of trim as I plan to have a rubber mat under the acrylic tank which I do not want to be showing. I purchased angled trim for the corners and insides and simple flat pieces of trim for around the top. This was the hardest part of the build as miter cuts can be confusing. I used a cheap $5 miter box because I didn't have a quality miter saw and therefor cut all of this trim with a small hand saw but it wasn't too bad. I used some adhesive especially for trim to attach the pieces and then came behind with some small 1d finishing nails to make sure the trim was on there. You will want to counter sink the nails and use some wood putty to hide all the nail holes. Another important step here is to take your wood putty and fill in any gaps where two pieces of trim meet. You will later sand all this down and it will make the trim look quite seamless. At the end of this step the stand looked like this. Note that I hadn't quite finished all the trim work yet but you get the idea:

The next step is to get out some 220 grit sand paper and start knocking all the wood putty flush with the surrounding wood. Remember you want to use putty anywhere you put a nail and anywhere that two pieces of trim meet. Take your time and look at the stand from multiple angles because you will find spots you missed. I also used some wood putty on the surface where the tank sits to take out any gouges or inconsistency in the plywood I used. I sanded the plywood top with some 220 grit on a large block to insure it was flat and there were no major high or low spots.
After all the sanding is done you should wipe the stand down with a warm damp cloth and allow it to dry. Once dry and free of all loose wood dust you can take a spray can or two of filler primer and really coat things well if you plan to paint which I recommend over stain for this style build. The filler primer is high piling so it takes out some of the inconsistencies here and there. Allow 24 hours or so to dry then take some 800 grit sandpaper and smooth out the primer. Once again use a damp cloth to clean the surface and allow to dry. After this step you can paint the stand any color you want just follow the instructions and don't lay the paint on too thick in a single coat. I did about 3 coats requiring maybe 4 cans of black semi-gloss.
Here is the final result! It looks nearly furniture store quality and will make a good addition to my living room.

Last edited: